This might be one of those itches that affects one person and one person alone, but I scratched it and now I’m sharing the result just in case someone else finds it helpful.
I wanted a system that would work independent of where my code repos are hosted, that didn’t assume a fully realized Laravel app, and that integrated in to my use of Nagios for infrastructure monitoring. I wanted something that would be able to take a list of root directories of any kind of application using composer and/or npm packages on a given server, and alert me as if there are known security vulnerabilities to handle.
(For some reason, thinking about this as a server-level issue makes sense to me. If one package on one app on a server is vulnerable, the whole server is vulnerable to compromise.)
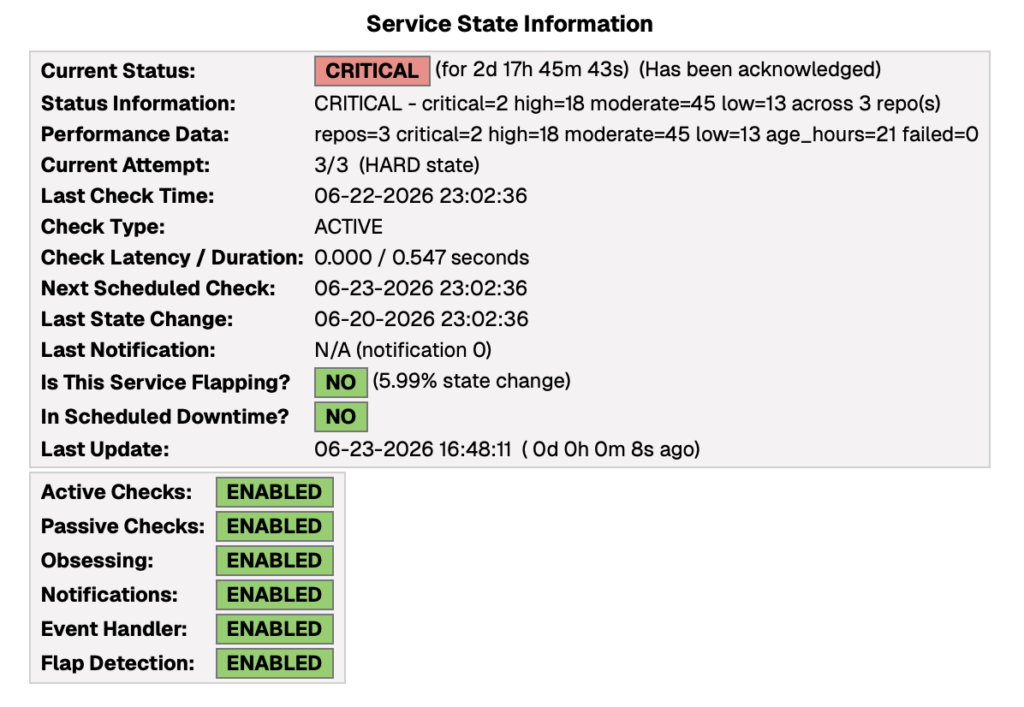
Thus was born package-vulnerability-audit, which combines a PHP scanning tool that runs the “audit” functions of both composer and npm on each application and outputs a JSON file with the results, and a Nagios NRPE script that checks the JSON file and returns an OK/WARNING/CRITICAL result to Nagios.
Once it’s set up, I can control the way I get alerted about these issues, and in theory give them a bit more urgency than an email notification.
The early reality is that I have some package updates to do, and I probably should have just spent time on that instead of building (with help from Claude) another tool. 😅
There are a million tools out there for monitoring services and measuring application performance, and I’m sure many of them are awesome.
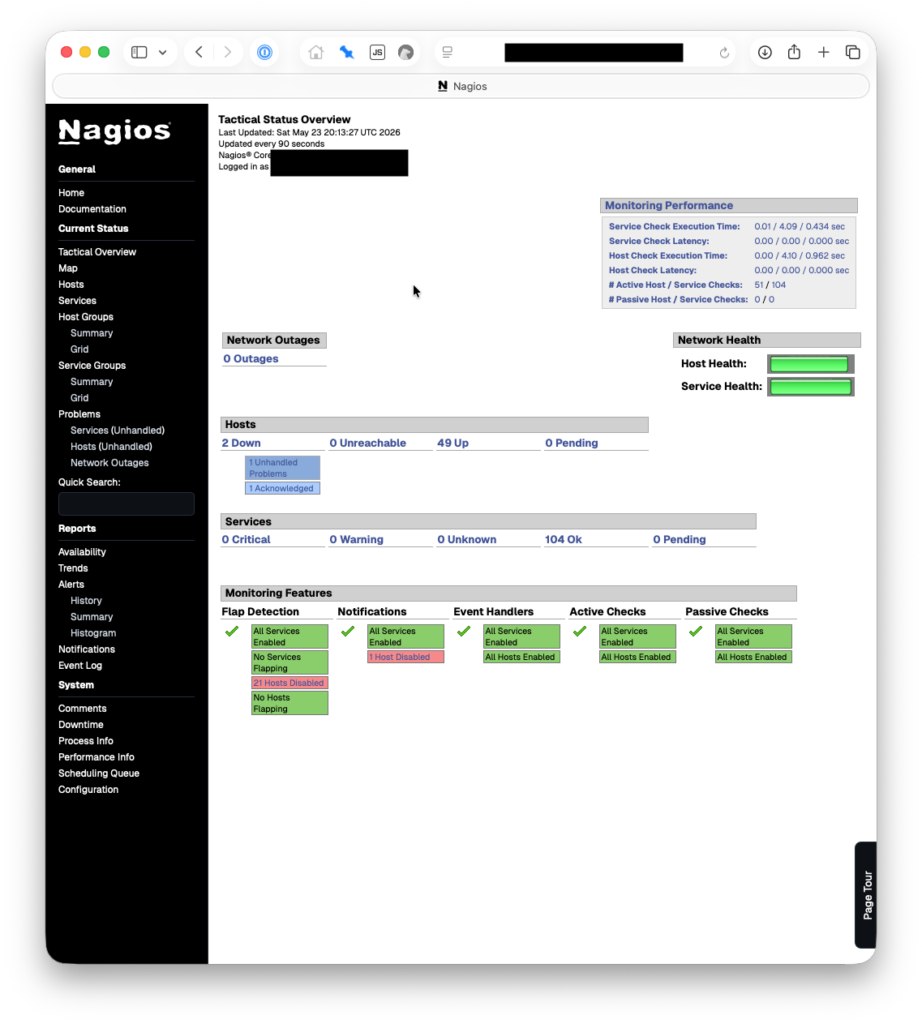
When I went looking for a good service and infrastructure monitoring solution for our community newspaper’s one-person IT department (me), I came back to an open source tool that I’d probably first started using over 20 years ago: Nagios.
It works great for us and only costs $4/month to self-host. I thought I’d share about how we’re using it in case others might find it helpful.
My needs were pretty straightforward.
I wanted to monitor 10 or so servers and network devices and various services hosted on them, the health of 20 or so web applications, and the status pages of about 20 external services/platforms we depend on.
When something gets slow or stops responding, I wanted to know about it in a reliable way.
We’d used Nagios extensively at the website development and hosting business I ran a long time ago, and it was great for this kind of thing. Highly configurable and flexible, low maintenance, and very reliable.
When looking at options more recently, Nagios didn’t seem to have changed much in all that time, and with its outdated web interface and arcane config file syntax, I convinced myself that someone had surely created a better tool by now. So, I spent a bunch of time researching alternatives, including Zabbix, Prometheus, Grafana, Datadog, New Relic, Pingdom, UptimeRobot, and a bunch of others. And we did start out using UptimeRobot for a brief while.
But when I looked at the amount of time I was going to spend learning and managing the complexity of those stacks, or the amount of money we would spend on SaaS tools along with some of the constraints and “per seat” or “per monitor” limits they imposed, the more I was ready to go with a tried and true, purpose-built option that could scale up without additional cost or complexity.
Nagios is not fun to set up initially — see my earlier comment about arcane config syntax. It probably took me the equivalent of a full day to get everything just so. But once I did, it’s been humming along great, and brings significant peace of mind.
We’re currently monitoring 54 hosts and 104 services. This is all on a $4/month droplet at Digital Ocean, 1 vCPU, 512 MB RAM, 10 GB Disk. We pay another $0.80/month for weekly droplet snapshots. We set our monitoring droplet up in a different physical region from the rest of our servers/droplets, on the other side of the continent.
I’m jotting down a few things I’ve learned about Apple’s iCloud Private Relay network service and the implications of using it for having parental controls or other network allow/block settings in place.
What is iCloud Private Relay?
Apple describes iCloud Private Relay as a privacy-protecting service that hides the IP address and network activity (DNS lookups, sites visited, etc.) of an Apple device.
So, it’s basically a proxy service that forces all network traffic through a new connection, although Apple has taken steps to ensure it’s not as simple as “now Apple sees everything instead of your ISP”. You can read an article from Cloudflare about their role in providing the separated ingress and egress proxy setup that ostensibly ensures no one company has all of the details about what you’re doing in a private relay browsing session.
I think Apple introduced the service in 2022, and in many cases I think it was just turned on by default for a lot of devices/browsers.
How do you use it or turn it off?
While Apple offers some UI settings that imply you can disable iCloud Private Relay, I’ve found it’s not that simple and that Apple’s presentation of the service can be misleading at times.
When I was figuring out how to enable our team at the newspaper to work in a more distributed fashion while maintaining network security, I looked at a variety of VPN and proxy options. In the end I settled on a simple proxy server setup using the squid open source proxy software.
I needed a solution that would work not only for our staff, where I could have some significant control over the setup of their work computing devices, but also for our contractors, where they would be using devices that were not under our control and presumably used for a mix of other things. I didn’t want anything locked in to a hardware vendor or dependent on a specific physical office location having connectivity. I wanted something fast to set up for each individual user, and that wouldn’t require installation of special software, activating/monitoring connections, or worrying about variations in network rules about what VPN connections were allowed.
I settled on squid:
We have a proxy auto-configuration file (PAC) that we serve publicly.
We set up a squid username/password for every user that needs one
Users tell their device the URL of the PAC file
Their device uses our squid proxy for the hosts/IPs we specify in the PAC file, and otherwise uses their default network configuration.
The first time their device attempts to connect via the proxy, they’re prompted to enter their username/password, and that typically is saved in their OS settings forever.
Using this approach we can ask network traffic bound for one of our internal services/servers to go through our proxy instead of over the public Internet. That in turn allows us to limit connection attempts to only trusted internal hosts (including the proxy), creating a kind of simple private network.
I recently set up a phone line for my 9-year-old. Why? I liked the idea of her being able to connect with others in a way she has control over, but with some of the natural limitations built in to a traditional landline and without the distractions of a smartphone. Okay, it also just seemed like a fun thing to try.
We’re referring to it as a landline since it has all the appearance and functionality of one — a single push-button phone connected to the wall with a cord — but behind the scenes it’s VOIP technology with some fun parental control features built in. It was relatively easy to set up as my home tech tinkering projects go, so I thought I’d share the details here.
My costs for this project were $61.90 in set up costs and around $5/month or less to operate, depending on call volume. (If your kid talks on the phone a lot, the voip provider I’m recommending offers a flat $4.25/month plan for up to 3,500 minutes, instead of the $0.009 to $0.01 per-minute rate I’m set up with.)
If you have more money than time, you could also look at Tin Can, as it seems to be a well-thought-out “landline for kids” product and service for $75 one time plus $10/month (first month free) and a few more polished parental control features. I haven’t tried it directly myself.
Requirements and Equipment
High speed home internet connection
An ethernet port somewhere near where you want the phone to be set up, and/or a really long phone cord
Some of the links above are affiliate links; I may receive a small commission if you purchase through them.
Get a phone number
Once your voip.ms account is created and you’ve enabled two-factor authentication, add some funds to your account via credit/debit card, maybe $10 to start with. You can also set the account up to auto-replenish your balance when the amount gets low.
Order a phone number, referred to on the site as a “DID” (direct inward dialing) number. This will cost $0.40 one time and then be $0.85/month after. (If you have an existing number you want to use, you can port it in to your voip.ms account, a process that has several steps but is perfectly manageable.)
When you’re asked to pick a registration server, pick one near where you live. I ran some ping tests on each nearby option, and the round trip times / latency were approximately similar, so I just picked the “first” server in a city’s available group.
If this line will be available to your kids when you are not home and you live in the US, I also suggest paying for E911 services, which is a $1.50 one time fee and $1.50/month after. This allows your kid to call 911 and have emergency services dispatched to the correct residential address. (Depending on how you look at it, the ability to make emergency calls that depend on a working internet connection, power, etc. could be a bad idea to rely on!)
Configure your VOIP account
Create a sub-account that will only be used for this phone number and line. This avoids having to use your main voip.ms account password in setting up the line configuration.
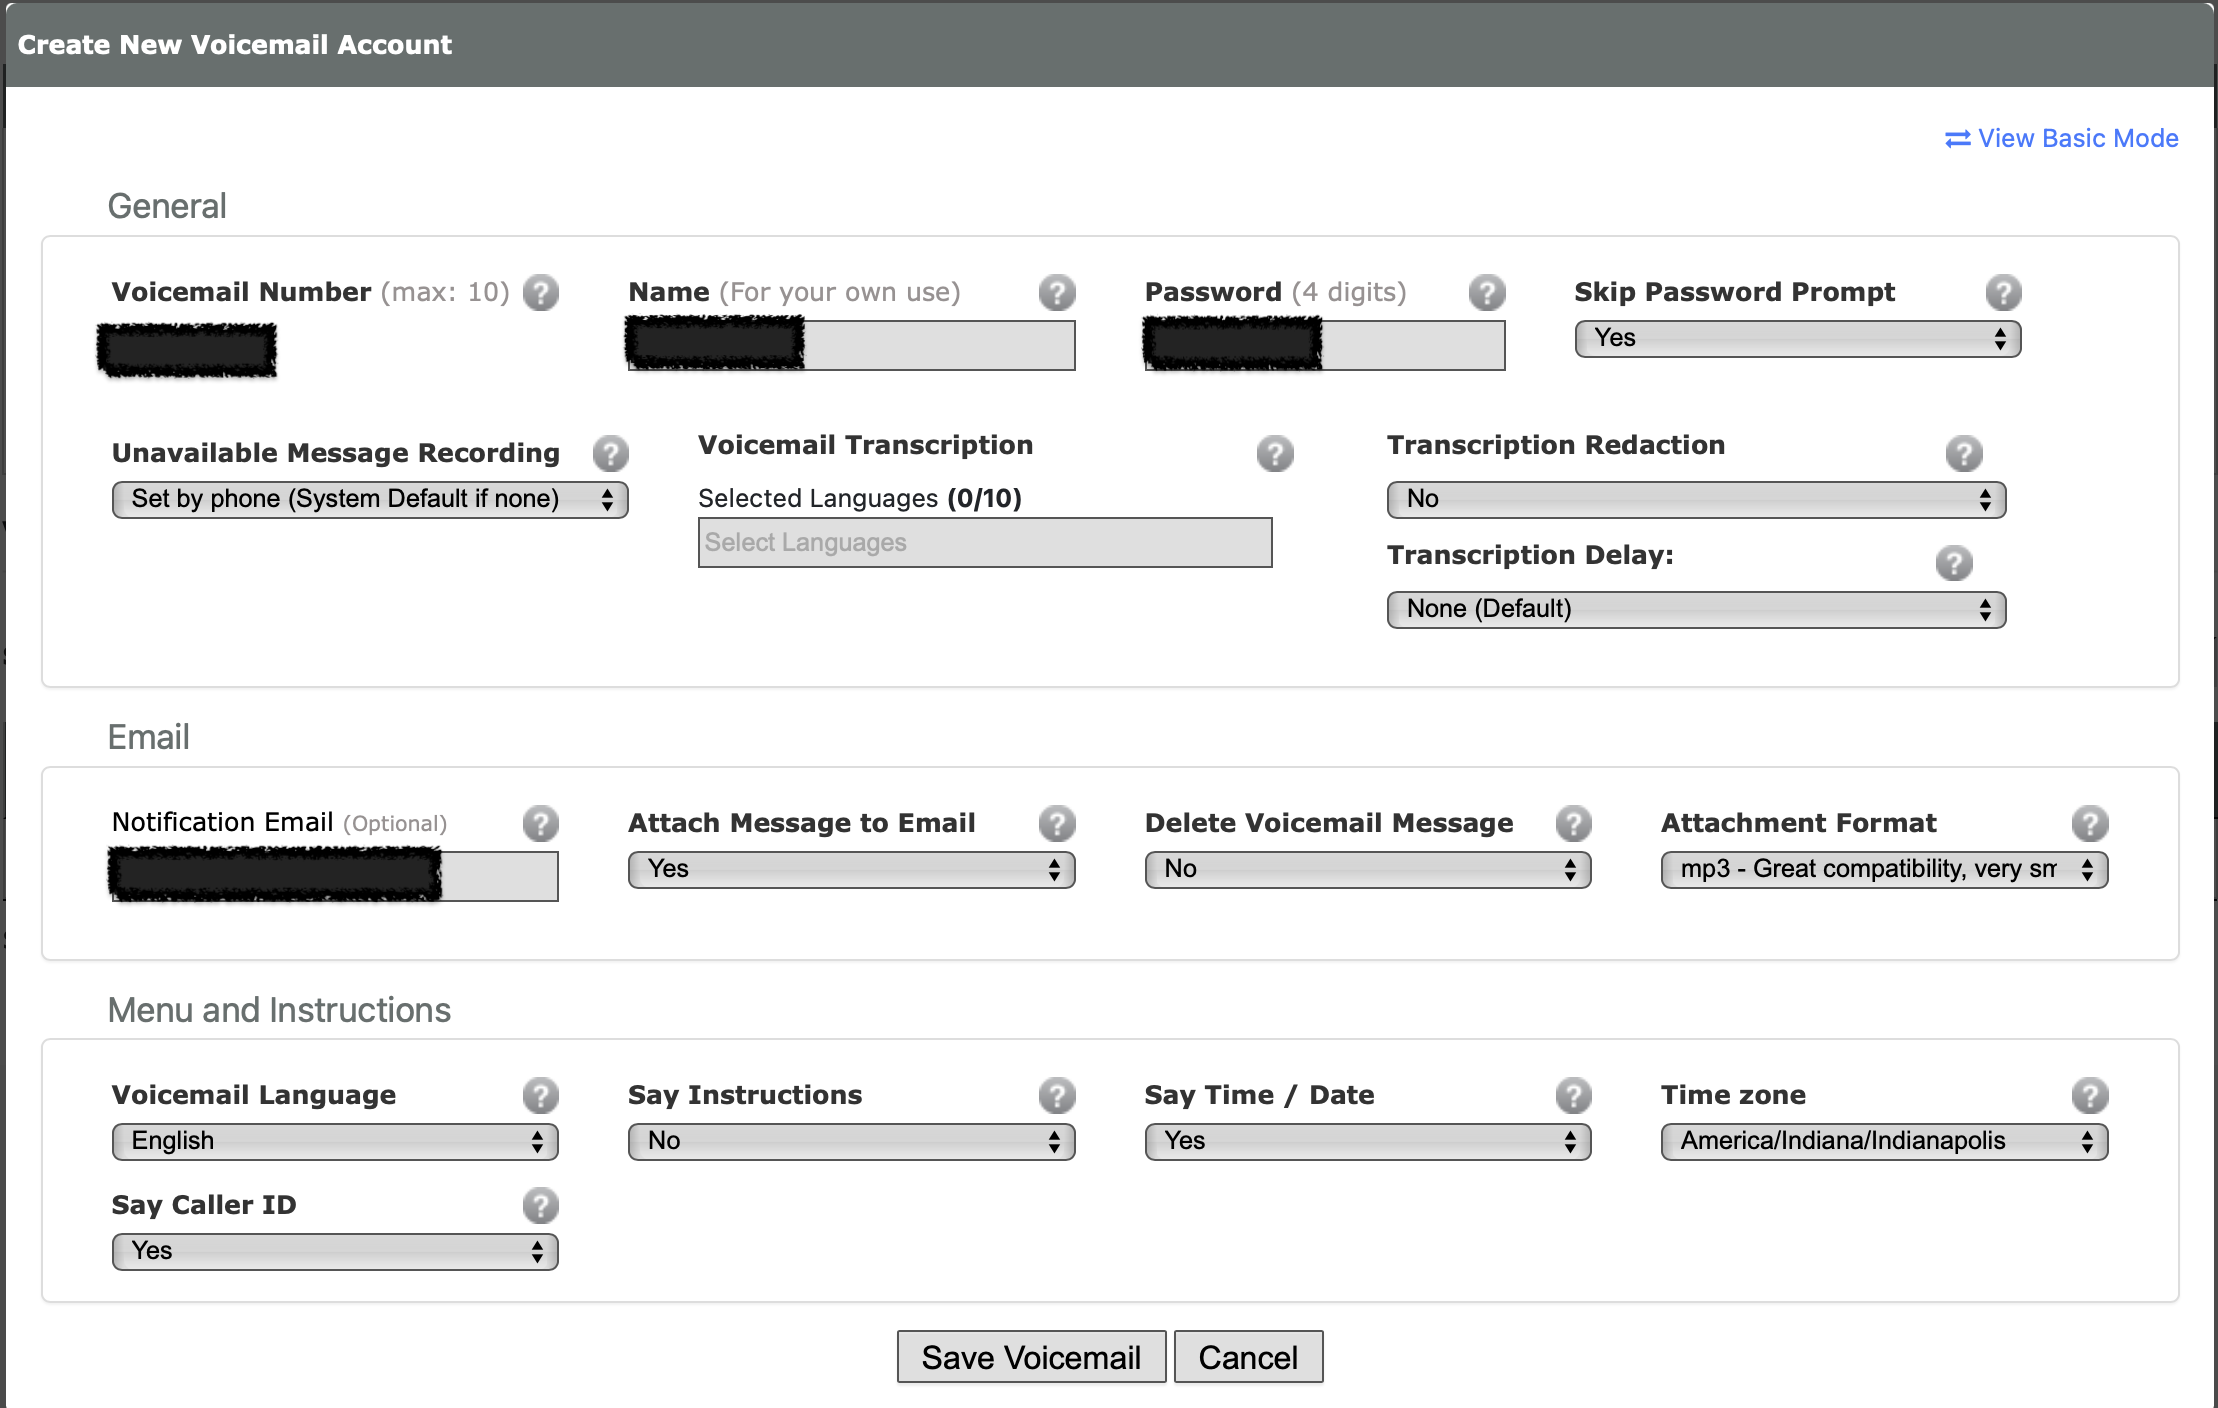
Create a voicemail account that your kid can receive voicemail messages on. It’s no extra cost unless you add in fancy transcription features. You can have voicemail recordings emailed; consider using an alias/address that goes to both your kid and adults in the household, or just the adults. Your kid will still be able access the voicemails directly by the phone itself.
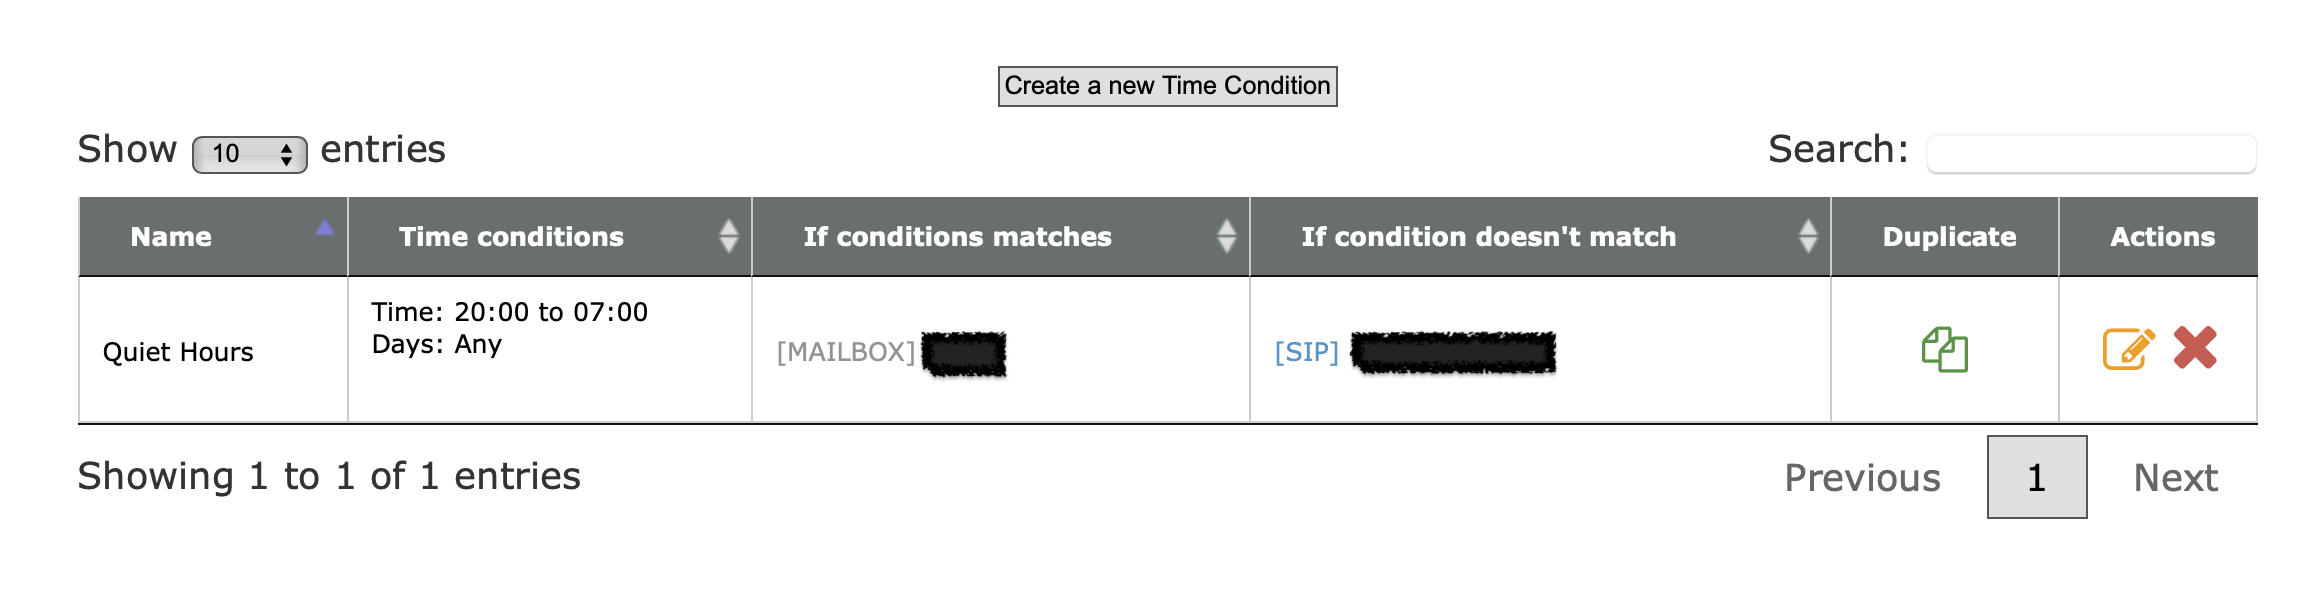
Consider setting up “do not disturb” hours. This is done with the Time Conditions feature at voip.ms.
Consider setting up CallerID filtering. You can import a list of phone numbers that are allowed to call in to your kid’s phone, and block everything else.
There are lots of other cool features that voip.ms offers for free as a part of having a DID number with them, so I encourage you to poke around their documentation and interface.
I will eventually shift away from managing the line’s features on voip.ms directly and use FreePBX running on a Raspberry Pi instead. This would expand the parental controls available (e.g. preventing outbound calls at certain times, limiting calls to certain numbers) also enable some cool additional integrations and fun features.
Set up the Grandstream device
This device will be the bridge between your traditional telephone and the VOIP.ms service. It’s what you will need to plug in to an ethernet port on your router or a switch connected to your router, and it’s also what your kids phone will be connected to. Again, a long phone cord may be the way to help them access the phone easily without needing to get to your home networking setup.
I recommend following the steps in this guide from the voip.ms folks to the letter. This is probably the most technical and potentially intimidating part of the process, but while some of the options on newer firmware versions of the Grandstream are labeled differently, it should be relatively straightforward.
Make sure you use the sub-account username and password you created above, not your main voip.ms account info.
I also enabled message waiting indication (MWI) which gives a stuttered dial tone when there’s a new voicemail message waiting.
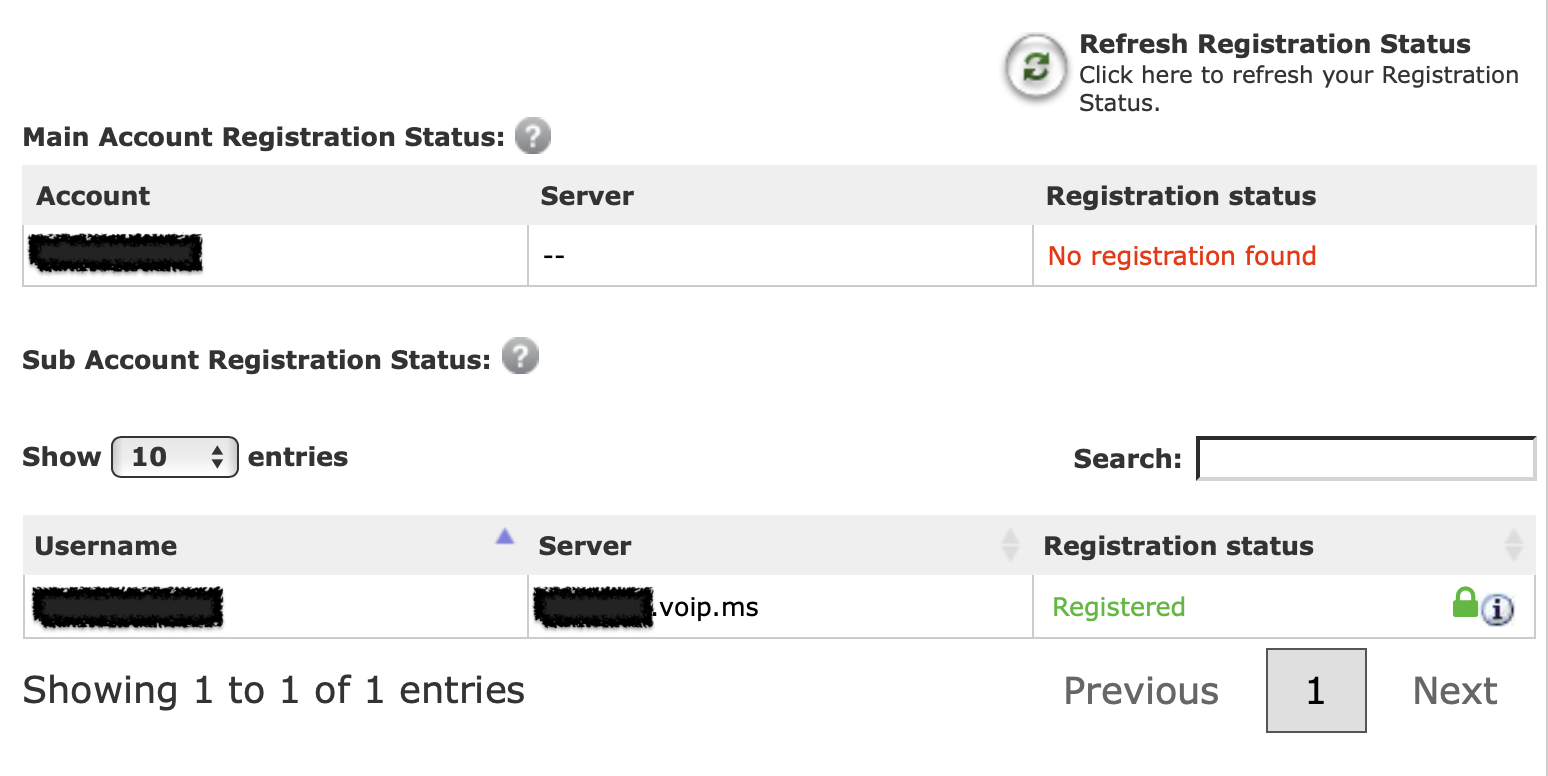
When everything is working correctly, you should see a blue light on the port 1 phone icon on the Grandstream device, and the subaccount should show as registered in your voip.ms account.
Plug in the phone and make calls!
After you plug in the phone to the port on the Grandstream device and pick it up, you should hear a dial tone, and you should be able to make and receive calls.
Even though my daughter had talked to others on one of our smartphones many times, she was so delighted to make and receive her first calls on her own phone line.
You can view the Call Detail Records (CDR) report in your voip.ms account to understand how much calls are costing, where calls are coming from and going to, etc.
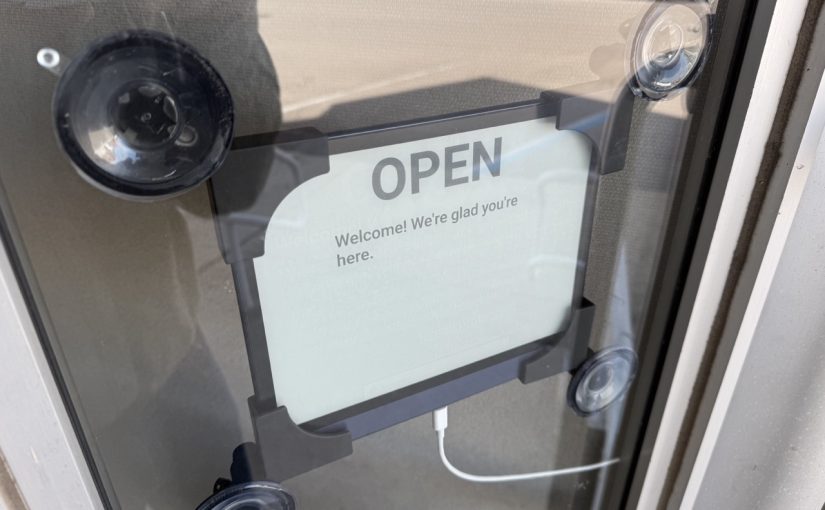
I wanted a sign I could mount in the window at the front entrance of our newspaper’s office to display customizable information about our office’s current status and other useful info.
If you’ve ever researched this category of products, you know there are many vendors out there who will happily sell you very expensive devices and supporting accessories to make this happen. This is “call us for pricing” level product sales meant for hotels, convention centers, malls and large office buildings, not for a small community newspaper on a budget.
Even the few standalone products I was able to find for sale on Amazon and elsewhere seemed pretty janky. I’d have to download an app or install a hub with a proprietary communication technology or be constrained to a certain number of characters and layout, or some other limitation I wasn’t quite happy with.
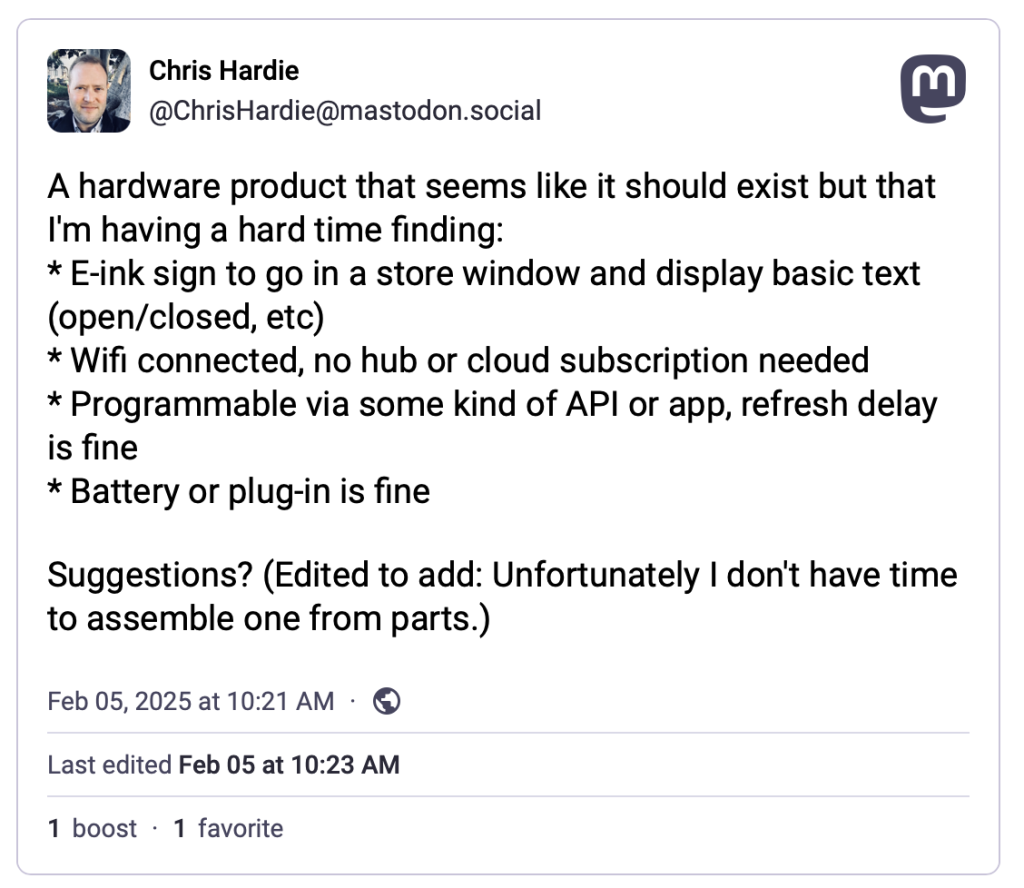
I decided to ask the Fediverse:
(I learned while writing this that Mastodon posts do not seem to embed in WordPress seamlessly – tragic!)
At first, the responses were reinforcing how difficult this might be to find, but then my colleague Scott Evans made a comment that sparked the eventual solution:
I feel like an e-ink reader of some kind might be your best bet (one that can run Android apps). Then you could install a kiosk style browser and update the page it’s pointing at. Something from Onyx? https://toot.scott.ee/@scott/statuses/01JKBE3QZWEZCMN2QZZH75R6BY
After some searching I found this wonderful blog post by Jan Miksovsky, MomBoard: E-ink display for a parent with amnesia. Jan described using a BOOX Note Air2 Series e-ink device to create a dynamic sign display for Jan’s mom. They used a web browser to load a simple website that would display the latest customized messages based on details configured in web interface elsewhere, source code here. I love it!
I emailed Jan with some questions about the setup and Jan was kind enough to write back with a clarification that the original BOOX ability to launch a web browser on device restart appears to have been removed, but a request is in to restore this functionality.
Jan also had a helpful thought about how to launch the browser in to full-screen mode, which I haven’t tried yet: “That’s controlled by whether a website has a web app manifest defined for it. If it does, then the browser “Add to Home Screen” command should allow you to add the site to your home screen. When launched, it should open in full screen mode.“
I found a used Note Air2 device on eBay for $189 plus shipping and tax. A non-trivial expense, but far less expensive than any of the other options I was finding.
When it arrived I turned off all of the “auto-sleep” type settings so that the device would basically stay on all the time. I tested out having the web browser stay open on one page for days on end, and it worked! Now I just needed to figure out my own web interface to manage the sign message.
So you’ve decided to publish timely content on the Internet but your website does not have an RSS feed.
Or even worse, you have played some role in designing or building a tool or service that other people use to publish timely content on the Internet, and you unforgivably allowed it to ship without support for RSS feeds.
And you probably just assume that a few remaining RSS feed nerds out there are just quietly backing away in defeat. “They’ll just have to manually visit the site every day if they want updates,” you rationalize. “They can download our app and get push notifications instead,” you somehow say with a straight face.
No.
I don’t know who you are. I don’t know what you want. If you are looking for clicks, I can tell you I don’t have any clicks left to give.
But what I do have are a very particular set of skills, skills I have acquired over a very long career. Skills that make me a nightmare for people like you.
If you publish your content in an RSS feed now, that’ll be the end of it. I will not look for you, I will not pursue you, I will simply subscribe to your feed.
But if you don’t, I will look for you, I will find you, and I will make an RSS feed of your website.
And here’s how I’ll do it.
(Psst, this last bit is a playful reference to the movie Taken, I am a nice person IRL and don’t actually tend to threaten or intimidate people around their technology choices. But my impersonation of a militant RSS advocate continues herein…)
Okay, heh, simple misunderstanding, you actually DO have an RSS feed but you do not mention or link to it anywhere obvious on your home page or content index. You know what, you’re using a <link rel="alternate" type="application/rss+xml" href="..." /> tag, so good for you.
I found it, I’m subscribing, we’re moving on, but for crying out loud please also throw a link in the footer or something to help the next person out.
You’re hiding your RSS feed URL structure in documentation or forum responses
Oh so you don’t have an advertised RSS feed or <link> tag but you do still support RSS feeds after all, it’s just that you tucked that fact away in some kind of obscure knowledgebase article or a customer support rep’s response in a community forum?
Fine. I would like you to feel a bit bad about this and I briefly considered writing a strongly worded email to that end, but instead I’m using the documented syntax to grab the link, subscribe and move on. Just…do better.
You decided to put your RSS feed behind a Cloudflare access check. Or you aggressively cached it. Or your web application firewall is blocking repeated accesses to the URL from strange network locations and user agents, which is exactly the profile of feed readers.
I understand, we can’t always remember to give every URL special attention.
But I will email your site administrator or tech support team about it, and you will open a low-priority ticket or send my request to your junk folder, and I will keep following up until you treat your RSS feed URLs with the respect they deserve.
You somehow ended up with some terrible, custom, non-standard implementation of RSS feed publishing and you forgot to handle character encoding or media formats or timestamps or weird HTML tags or some other thing that every other established XML parsing and publishing library has long since dealt with and now you have an RSS feed that does not validate.
Guess what, RSS feeds that don’t validate might as well be links to a Rick Astley video on YouTube given how picky most RSS feed readers are. It’s just not going to work.
But I will work with that. I will write a cron job that downloads your feed every hour and republishes it with fixes needed to make it valid.
#!/bin/sh

# Define variables for URLs, file paths, and the fix to apply
RSS_FEED_URL="https://example.com/rss.xml"
TEMP_FILE="/tmp/rss_feed.broken"
OUTPUT_FILE="/path/to/feeds/rss_feed.xml"
SEARCH_STRING="Parks & Recreation"
REPLACEMENT_STRING="Parks & Recreation"

# Download the RSS feed
curl -s -L -o "$TEMP_FILE" "$RSS_FEED_URL"

# Fix invalid characters or strings in the RSS feed
perl -pi -e "s/$SEARCH_STRING/$REPLACEMENT_STRING/gi;" "$TEMP_FILE"

# Move the fixed file to the desired output location
cp "$TEMP_FILE" "$OUTPUT_FILE"

# Clean up the temporary file
rm "$TEMP_FILE"
If I want to embarrass you in front of your friends I will announce the new, valid feed URL publicly and let others use it too. But really, you should just fix your feed and use a standard library.
You programmatically publish your timely content in a structured format from a structured source but offer no RSS feed? What a terrible decision you’ve made for the distribution of your information, for your readers, for your stakeholders, and for the whole world.
But ’tis no matter, I’ll have an RSS feed of your site up and running shortly using a DOM crawler (e.g. Symfony’s DomCralwer component in PHP) that can navigate HTML and XML documents using XPath, HTML tags or CSS selectors to get me what I want.
Your stuff’s generated using an HTML/CSS template with a loop? Great? Or it’s even just in a plain HTML table? Let’s do this.
You use asynchronous requests to fetch JSON and render your content
You were right there at the finish line, buddy, and you choked.
You had everything you need — structured data storage, knowledge of how to convey data from one place to another in a structured format, probably some API endpoints that already serve up exactly what you need — all so you can dynamically render your webpage with a fancy pagination system or a super fast search/filter feature.
And yet, still, you somehow left out publishing your content in one of the most commonly used structured data formats on the web. (Psst, that’s RSS that I’m talking about. Pay attention, this whole thing is an RSS thing!)
So I will come for your asynchronous requests. I will use my browser’s dev tools to inspect the network requests made when you render your search results, and I will pick apart the GET or POST query issued and the headers and data that are passed with it, and I will strip out the unnecessary stuff so that we have the simplest query possible.
If it’s GraphQL, I will still wade through that nonsense. If it uses a referring URL check as some kind of weak authentication, I will emulate that. If you set an obscurely named cookie on first page visit that is required to get the content on page visit two, be assured that I will find and eat and regurgitate that cookie.
And then I will set up a regularly running script to ingest the JSON response and create a corresponding RSS feed that you could have been providing all along. I can do this all day long.
Even though I build my content fetching tools to be good citizens on the web — at most checking once per hour, exponential backoff if there are problems, etc. — you may still decide to block random web requests for random reasons. Maybe it’s the number of queries to a certain URL, maybe it’s the user agent, or maybe it’s because they’re coming from the IP address of a VPS in a data center that you assume is attacking you.
Fine. Whatever. I used to spend time trying to work around individual fingerprinting and blocking mechanisms, but I got tired of that. So now I pay about $25/year for access to rotating residential IP addresses to serve as proxies for my requests.
I don’t like supporting these providers but when I come to make an RSS feed of your content, it will look like it’s from random Jane Doe’s home computer in some Virginia suburb instead of a VPS in a data center.
You don’t put timely new content on your website, but you sure do love your fancy email newsletters with the timely updates your audience is looking for. You like them so much that you favor them over every other possible content distribution channel, including a website with an RSS feed.
That’s okay. Fortunately, many email newsletter platforms have figured out that offering a web-based archive of past newsletter campaigns is a valuable service they can provide to, um, people like you, and many of those have figured out that including an RSS feed of said campaigns is worthwhile too.
Mailchimp puts a link to right there in the header of their web-based view of an individual campaign send unless (boo) a list owner has turned off public archives, which you should seriously NOT do unless your list really needs to be private/subscribers only.
You’re using an email newsletter platform that doesn’t have RSS feeds built in?
Please, allow me to make one for you. I will subscribe to your email newsletter with a special address that routes messages to a WordPress site I set up just for the purpose of creating public posts with your newsletter content. Once that’s done, the RSS part is easy given that WordPress has that support built right in.
I’ve detailed the technical pieces of that particular puzzle in a separate post:
Your mobile app is where you put all the good stuff
No RSS feed. No email newsletter. The timely content updates are locked up in your mobile app where the developers involved have absolutely no incentive to provide alternative channels you didn’t ask for.
No hope? This is probably where a reasonable person would say “nah, I’m out.” Me? I’m still here.
The nice thing is that if a mobile app is reasonably well designed and supports any kind of information feed, push notifications, etc. then it almost has to have some kind of API driving that. Sometimes the APIs are gloriously rich in the information they make available, but of course usually also completely undocumented and private.
I’ve found Proxyman to be an indispensable tool for what I need to do next:
Intercept all web traffic from my mobile device and route it through my laptop
Install a new certificate authority SSL certificate on my mobile device that tells it to trust my laptop as a source of truth when verifying the validity of SSL certificates for certain domains.
Start making requests from your mobile app that loads the information I want to be in an RSS feed.
Review the HTTP traffic being proxied through my laptop and look for a request that has a good chance of being what I want.
Tell my laptop to intercept not only the traffic meta data but the secure SSL-encrypted traffic to the URL I care about.
Inspect the request and response payload of the HTTPS request and learn what I need to know about how the API powering that mobile app feed operates.
It’s an amazing and beautiful process, and if it’s wrong I don’t want to be right.
If too many mobile app developers get wind of this kind of thing happening, they’ll start using SSL certificate pinning more, which builds in to the app the list of certificates/certificate authorities that can be trusted, removing the ability to intercept by installing a new one. So, you know, shhh. (Joking aside, secure all the things, use certificate pinning…but then also publish an RSS feed!)
Once I have your mobile app’s API information, it’s back to the mode of parsing a JSON response noted above, and generating my own RSS feed from it.
There are other escalations possible, of course. Taking unstructured data and feeding it to an LLM to generate structured data. Recording and replaying all the keystrokes, mouse moves and clicks of a web browsing session. Convincing an unsuspecting IT department worker to build a special export process without really mentioning it to anyone. Scraping data from social media platforms.
I’ve done it all, none of it is fun, and none of it should be necessary.
Publish your info in a structured, standard way.
What do I do with all of these feeds?
Thanks for asking. I own a newspaper. We publish in print and online. Our job is to be aware of what’s happening in the community so we can distill what’s most important and useful in to reporting that benefits our readers. We have a very small staff tasked with keeping up with a lot of information. Aggregating at least some of it through RSS feeds has made a huge difference in our work.
Oh, you meant at the technical level? I have one Laravel app that is just a bunch of custom classes doing the stuff above and outputting standard RSS feeds. I have another Laravel app that aggregates all of the sources of community information I can find, including my custom feeds, in to a useful, free website and a corresponding useful, free daily email summary. I also read a lot of it in my own feed reader as a part of my personal news and information consumption habits.
Related writings
I’ve written a lot of stuff elsewhere about how to unlock information from one online source or another, and the general concepts of working on a more open, interoperable, standards-based web. If you enjoyed the above, you might like these:
At the newspaper we make heavy use of FreePBX and Asterisk to power our phone system. That includes the use of the call queue feature, where a caller interested in subscriptions or advertising or placing an obituary can be routed to the right place via a phone menu, hear an appropriate message, and then ring through to one of the staff members trained to help with that particular topic, or leave a voicemail in the right place if no one is available. We’re a small paper and our phone system is mostly quiet, but I have seen days where multiple calls are being handled simultaneously, and queues are very helpful.
One aspect of our setup that has taken some figuring out is having staff log in and out of the phone system so that they can be available to answer those queue calls at the right time.
Remembering to log in at the start of the day is fairly straightforward, though is still a habit all of us our developing. Remembering to log out at the end of the day is for some reason a bit more hit and miss; when my brain has decided it’s time to leave the office or stop working, for some reason logging out of the phone is frequently not top of mind, and apparently that’s often true for my coworkers as well.
It may not seem like it would be a big deal to just let folks stay logged in all the time, but it can mean the difference between a caller sitting on hold for an extra minute or two as the phone system rings the phones of folks who have left for the day, or the caller more quickly getting a useful message and the option to leave a voicemail. We could address this through more complex conditional logic in our phone system set up, but for now I’m trying to address it in a way that mostly maintains user-level control.
So, based on some other bits and pieces of scripts found on Stackoverflow and elsewhere (##), I put together this Bash script that logs everyone out of all queues:
#!/usr/bin/bash

# Remove an Asterisk agent from queues, or all agents from all queues

Help()
{
   # Display Help
   echo "Remove Asterisk dynamic agents from queues."
   echo
   echo "Syntax: remove_from_queue.sh [-a|eh]"
   echo "options:"
   echo "a         Remove all members from all queues."
   echo "e <123>   Specify an extension to be removed ."
   echo "h         Print this help."
   echo
}

while getopts ":ahe:" option; do
   case $option in
      h) # display Help
         Help
         exit;;
      e) # Enter a specific extension to be removed
         member=$OPTARG;;
      a) # set all queue members to be removed
         all=true;;
      \?) # Invalid option
         echo "Error: Invalid option"
         exit;;
   esac
done

## all queues
declare -a queues=(`asterisk -rx "queue show" | cut -d " " -f1`  )

for q in "${queues[@]}"
do
    ## all agents in queue
    declare -a members=(`asterisk -rx "queue show $q" | grep "/" | cut -d"(" -f2 | cut -d" " -f1`)

    for m in "${members[@]}"
    do
       if [ ! -z $member ]; then
          if [[ $m == *"$member"* ]]; then
              echo "Removing member Local/$member@from-queue/n from $q"
              cmd="queue remove member Local/$member@from-queue/n from $q"
              asterisk -rx "$cmd"
          fi
       else
         if [ "$all" = "true" ]; then
             echo "Removing member $m from $q"
              cmd="queue remove member $m from $q"
              asterisk -rx "$cmd"
         fi
       fi
    done
done
I run it via cron like so:
# Remove all asterisk queue agents from all queues at the end of the day
0 18  *  *  *  root       /usr/local/bin/remove_from_queue.sh -a
I’ve been making more use of Cloudflare as a DNS and proxy/DoS protection service. I tend to use it by default now when I set up any kind of public-facing web application that might attract non-trivial traffic, store sensitive information, or where performance is a factor.
When spinning up a new server on an infrastructure platform like Digital Ocean, it’s almost certain that the IP address assigned to it is going to immediately see traffic from bad actors using automated attempts to find a web-based exploit. Even if you put Cloudflare in front of a web service and lock things down, connection attempts directly to the IP address will bypass their proxy and get through.
That’s where this first script comes in handy. Instead of allowing all tcp network activity to ports 80 and 443 to get through, I want to only allow traffic from known Cloudflare IP addresses. We can do this using the Ubuntu ufw firewall and Cloudflare’s published IP address blocks.
GadElKareem shared a script that I’ve adapted a bit to make use of ufw’s application profiles:
#!/usr/bin/env bash

set -euo pipefail

# lock it
PIDFILE="/tmp/$(basename "${BASH_SOURCE[0]%.*}.pid")"
exec 200>${PIDFILE}
flock -n 200 || ( echo "${BASH_SOURCE[0]} script is already running. Aborting . ." && exit 1 )
PID=$$
echo ${PID} 1>&200

cd "$(dirname $(readlink -f "${BASH_SOURCE[0]}"))"
CUR_DIR="$(pwd)"

wget -q https://www.cloudflare.com/ips-v4 -O /tmp/cloudflare-ips-v4
wget -q https://www.cloudflare.com/ips-v6 -O /tmp/cloudflare-ips-v6

for cfip in `cat /tmp/cloudflare-ips-v4`; do /usr/sbin/ufw allow from $cfip to any app "Nginx Full" comment "cloudflare"; done
for cfip in `cat /tmp/cloudflare-ips-v6`; do /usr/sbin/ufw allow from $cfip to any app "Nginx Full" comment "cloudflare"; done
It basically downloads known Cloudflare IPv4 and IPv6 addresses and then adds ufw rules to allow traffic from those addresses. I run this on a cron job like so:
The final step is to remove any ufw rules that allow traffic through to ports 80 and 443 for any source IP. This kind of rule may or may not be in place as a part of your existing server configuration.
The end result is that any web connection attempts not from Cloudflare will not be allowed through.
A second challenge with Cloudflare is making sure anything you do with visitor IP addresses found in access logs is using the actual original visitor IP instead of the Cloudflare proxy IP. An example would be using fail2ban to block accesses from a host that has tried too many times to gain unauthorized access to a server.
Fortunately, Cloudflare passes through the original visitor IP as a header, so we just have to make use of that in our logs. This script, originally shared by ergin on GitHub, will download the published Cloudflare IP addresses and generate an nginx-friendly configuration file that adjusts the “real IP” of the visitor for logging and other purposes:
#!/bin/bash

CLOUDFLARE_FILE_PATH=/etc/nginx/conf.d/cloudflare-realips.conf

echo "#Cloudflare" > $CLOUDFLARE_FILE_PATH;
echo "" >> $CLOUDFLARE_FILE_PATH;

echo "# - IPv4" >> $CLOUDFLARE_FILE_PATH;
for i in `curl -s https://www.cloudflare.com/ips-v4/`; do
    echo "set_real_ip_from $i;" >> $CLOUDFLARE_FILE_PATH;
done

echo "" >> $CLOUDFLARE_FILE_PATH;
echo "# - IPv6" >> $CLOUDFLARE_FILE_PATH;
for i in `curl -s https://www.cloudflare.com/ips-v6/`; do
    echo "set_real_ip_from $i;" >> $CLOUDFLARE_FILE_PATH;
done

echo "" >> $CLOUDFLARE_FILE_PATH;
echo "real_ip_header CF-Connecting-IP;" >> $CLOUDFLARE_FILE_PATH;

#test configuration and reload nginx
nginx -t && systemctl reload nginx
Because the config file is output in the /conf.d/ directory in the nginx main directory, the default nginx config will pick up its contents without further action.
Continuing with the example of using fail2ban to block unwanted traffic from abusive hosts, you can set up a set of custom Cloudflare ban/unban actions in a file like /etc/fail2ban/action.d/cloudflare.conf, using this version adapted from the original by Mike Rushton:
and then in the jail.local file you can set this up as the default action:
cfemail=<your cloudflare@email here.com>
cfapikey=<your cloudflare API key here>

# Define CF ban action without mailing
action_cf = cloudflare[cfuser="%(cfemail)s", cftoken="%(cfapikey)s"]

# Set default action to Cloudflare ban/unban
action = %(action_cf)s
The end result is that bad actors never get past Cloudflare’s proxy protection to attempt additional foolishness directly on your server.
Thanks to all of the folks who created the original version of these scripts. If you have suggestions for improvement or your own fun Cloudflare tooling, please share!