Setting up a landline phone for kids

I recently set up a phone line for my 9-year-old. Why? I liked the idea of her being able to connect with others in a way she has control over, but with some of the natural limitations built in to a traditional landline and without the distractions of a smartphone. Okay, it also just seemed like a fun thing to try.

(Just today, a few days after I did this, The Atlantic came out with an article expanding on this thinking: The Dumbest Phone Is Parenting Genius: Landlines encourage connection—without the downsides of smartphones. Hat tip to Damon for sending me the link.)

We’re referring to it as a landline since it has all the appearance and functionality of one — a single push-button phone connected to the wall with a cord — but behind the scenes it’s VOIP technology with some fun parental control features built in. It was relatively easy to set up as my home tech tinkering projects go, so I thought I’d share the details here.

My costs for this project were $61.90 in set up costs and around $5/month or less to operate, depending on call volume. (If your kid talks on the phone a lot, the voip provider I’m recommending offers a flat $4.25/month plan for up to 3,500 minutes, instead of the $0.009 to $0.01 per-minute rate I’m set up with.)

If you have more money than time, you could also look at Tin Can, as it seems to be a well-thought-out “landline for kids” product and service for $75 one time plus $10/month (first month free) and a few more polished parental control features. I haven’t tried it directly myself.

Requirements and Equipment

Some of the links above are affiliate links; I may receive a small commission if you purchase through them.

Get a phone number

Once your voip.ms account is created and you’ve enabled two-factor authentication, add some funds to your account via credit/debit card, maybe $10 to start with. You can also set the account up to auto-replenish your balance when the amount gets low.

Order a phone number, referred to on the site as a “DID” (direct inward dialing) number. This will cost $0.40 one time and then be $0.85/month after. (If you have an existing number you want to use, you can port it in to your voip.ms account, a process that has several steps but is perfectly manageable.)

When you’re asked to pick a registration server, pick one near where you live. I ran some ping tests on each nearby option, and the round trip times / latency were approximately similar, so I just picked the “first” server in a city’s available group.

If this line will be available to your kids when you are not home and you live in the US, I also suggest paying for E911 services, which is a $1.50 one time fee and $1.50/month after. This allows your kid to call 911 and have emergency services dispatched to the correct residential address. (Depending on how you look at it, the ability to make emergency calls that depend on a working internet connection, power, etc. could be a bad idea to rely on!)

Configure your VOIP account

Create a sub-account that will only be used for this phone number and line. This avoids having to use your main voip.ms account password in setting up the line configuration.

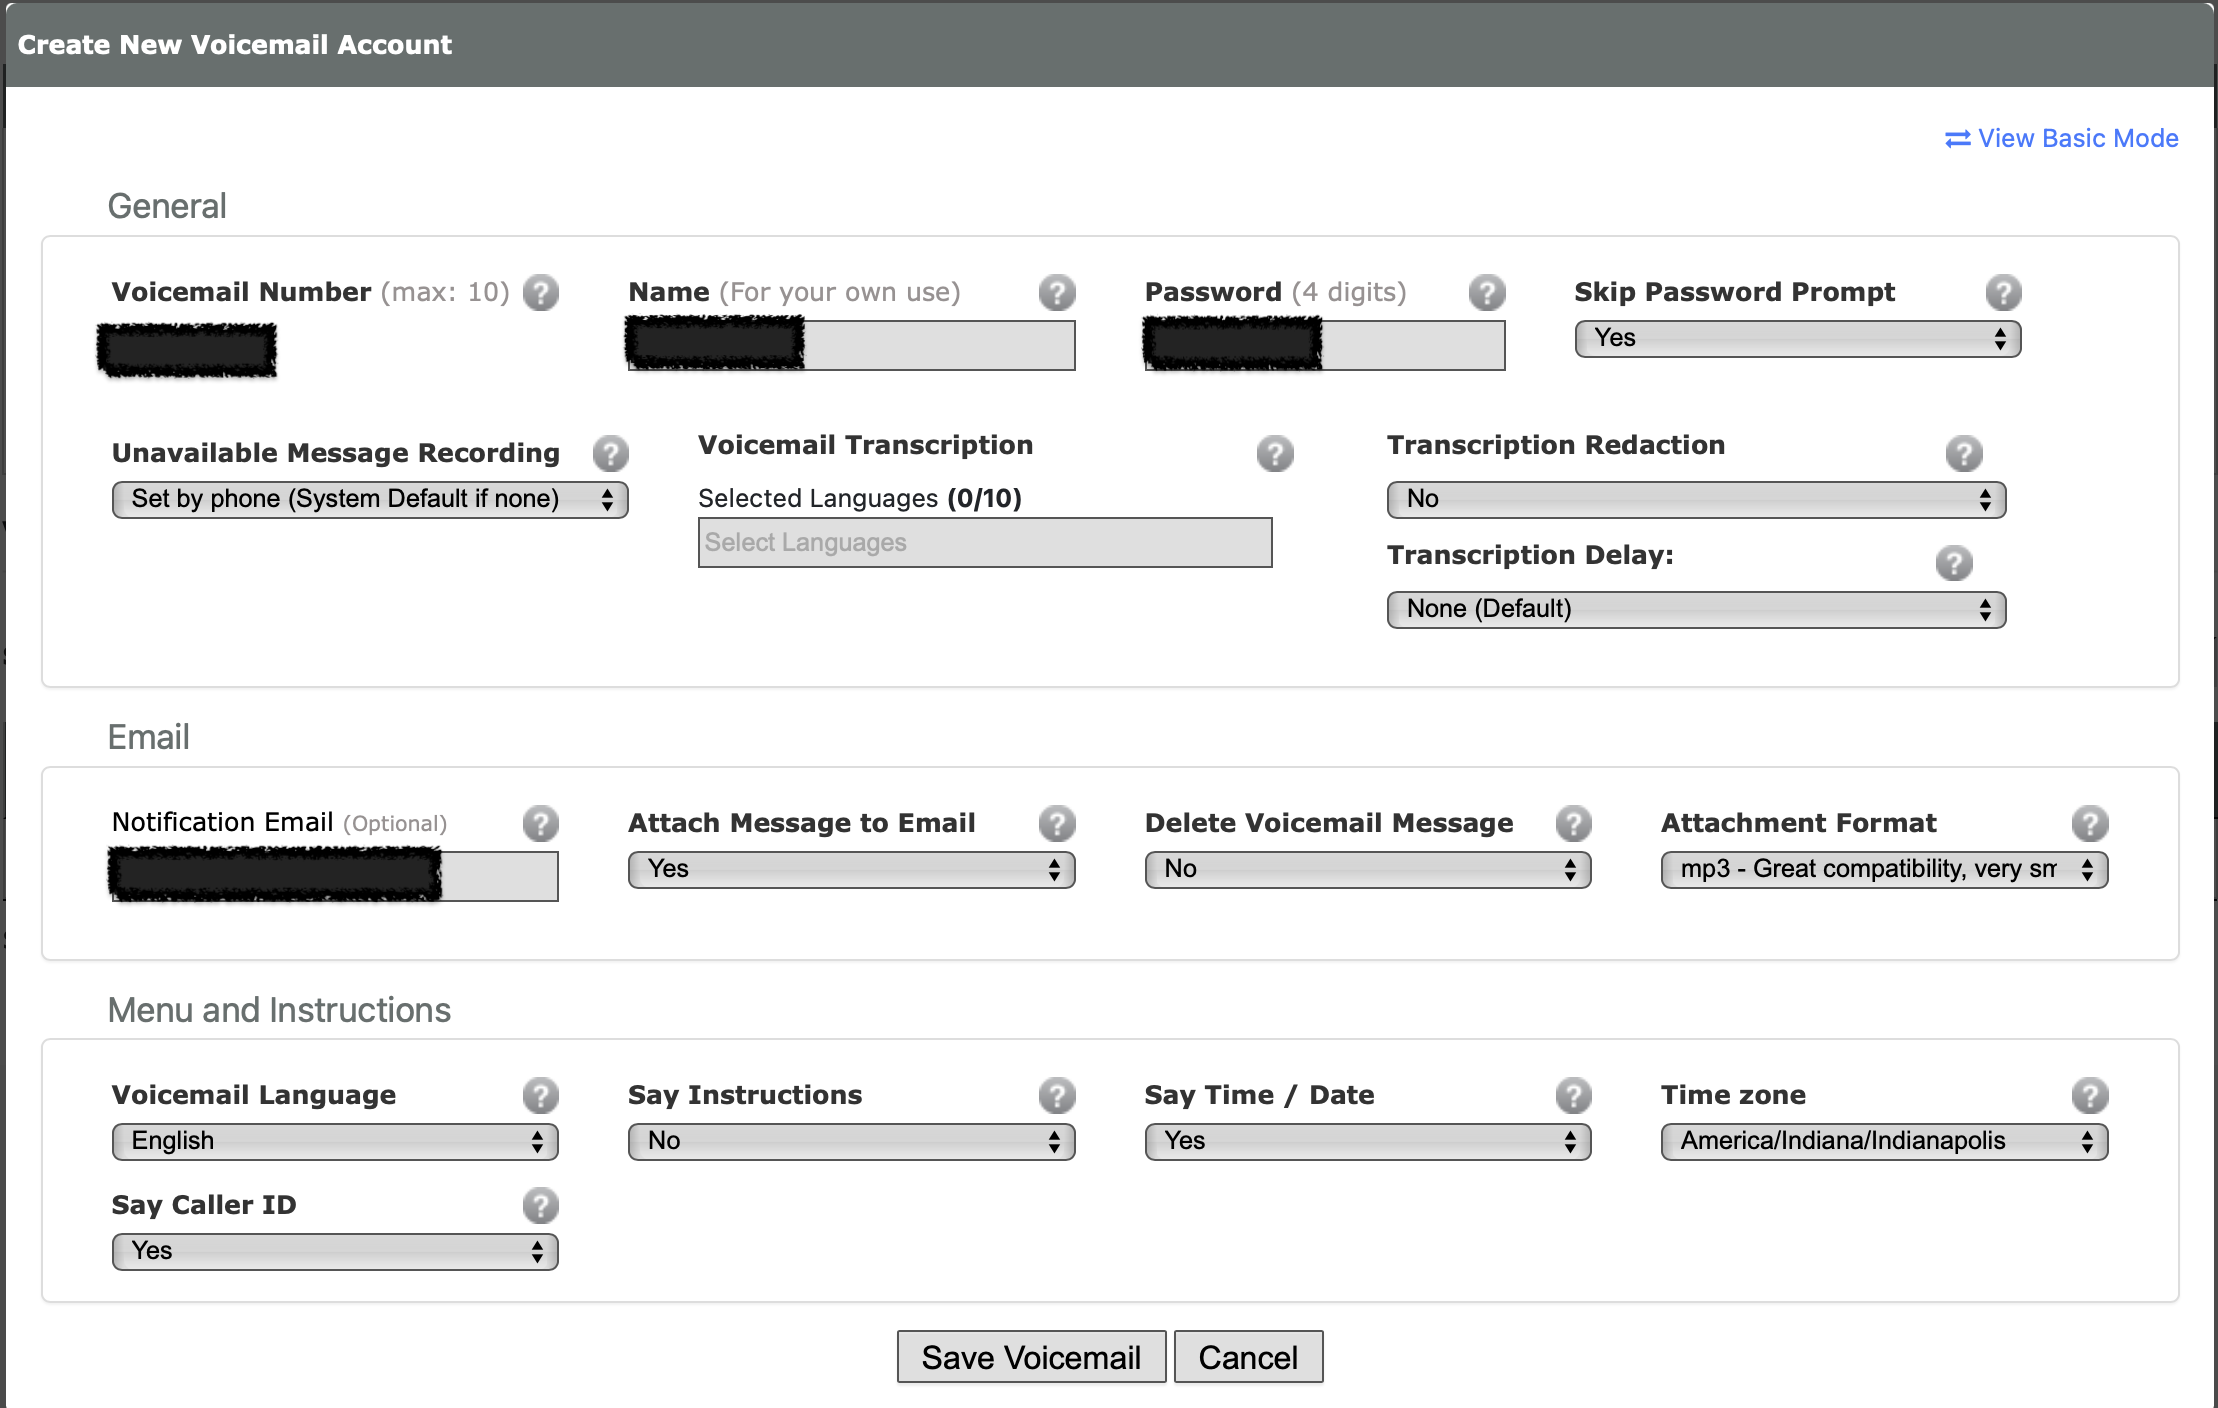
Create a voicemail account that your kid can receive voicemail messages on. It’s no extra cost unless you add in fancy transcription features. You can have voicemail recordings emailed; consider using an alias/address that goes to both your kid and adults in the household, or just the adults. Your kid will still be able access the voicemails directly by the phone itself.

Screenshot of voicemail config at voip.ms

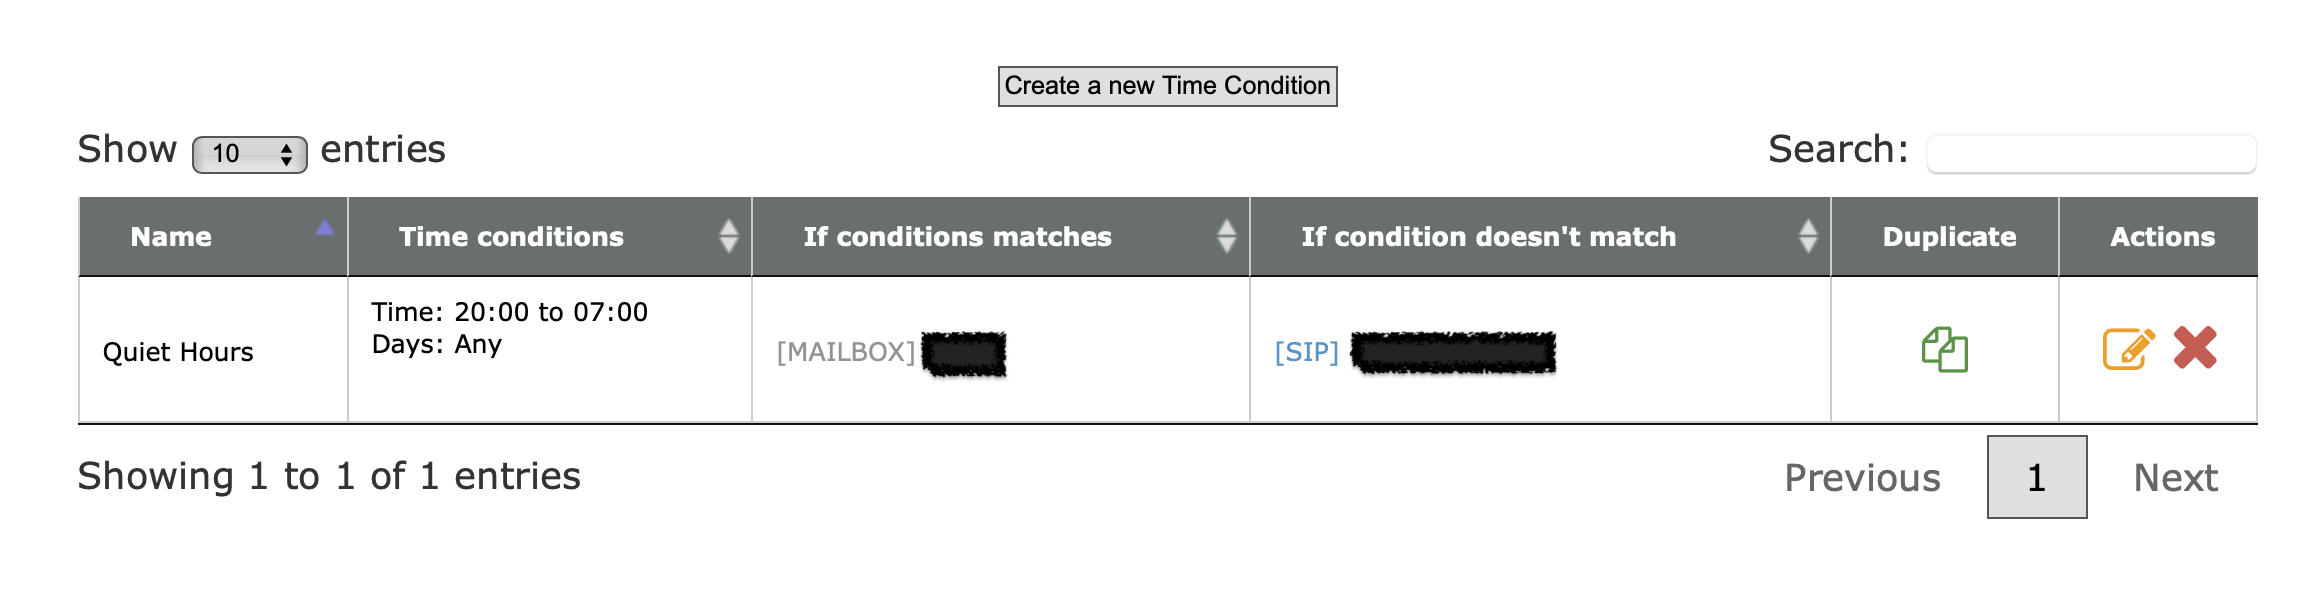
Consider setting up “do not disturb” hours. This is done with the Time Conditions feature at voip.ms.

Screenshot of time conditions setup at voip.ms

Consider setting up CallerID filtering. You can import a list of phone numbers that are allowed to call in to your kid’s phone, and block everything else.

Screenshot of CallerID filtering at voip.ms

There are lots of other cool features that voip.ms offers for free as a part of having a DID number with them, so I encourage you to poke around their documentation and interface.

I will eventually shift away from managing the line’s features on voip.ms directly and use FreePBX running on a Raspberry Pi instead. This would expand the parental controls available (e.g. preventing outbound calls at certain times, limiting calls to certain numbers) also enable some cool additional integrations and fun features.

Set up the Grandstream device

This device will be the bridge between your traditional telephone and the VOIP.ms service. It’s what you will need to plug in to an ethernet port on your router or a switch connected to your router, and it’s also what your kids phone will be connected to. Again, a long phone cord may be the way to help them access the phone easily without needing to get to your home networking setup.

I recommend following the steps in this guide from the voip.ms folks to the letter. This is probably the most technical and potentially intimidating part of the process, but while some of the options on newer firmware versions of the Grandstream are labeled differently, it should be relatively straightforward.

Make sure you use the sub-account username and password you created above, not your main voip.ms account info.

I enabled encryption for calls, which involves enabling it both on the SIP subaccount and on the Grandstream device.

I also enabled message waiting indication (MWI) which gives a stuttered dial tone when there’s a new voicemail message waiting.

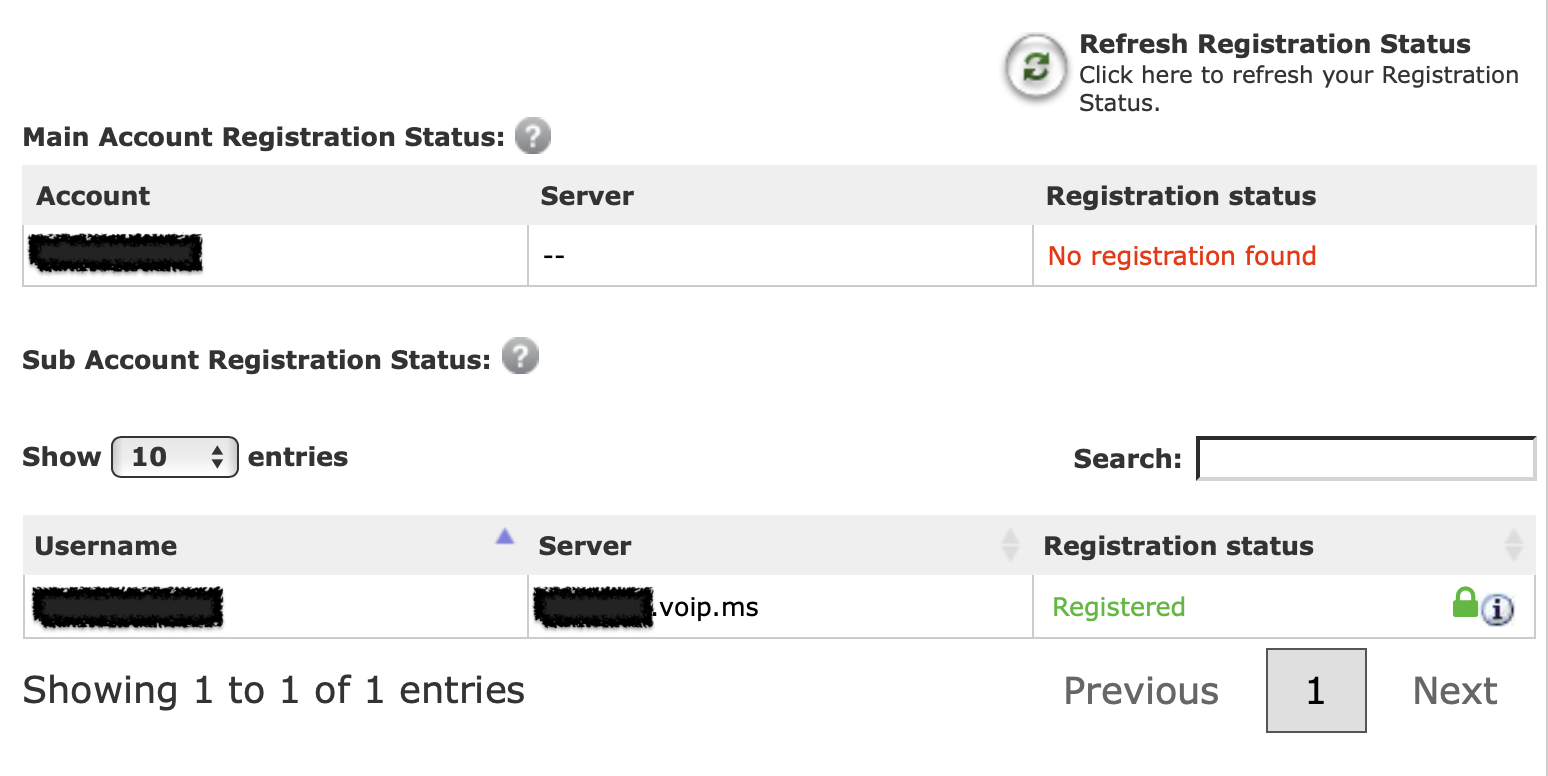
When everything is working correctly, you should see a blue light on the port 1 phone icon on the Grandstream device, and the subaccount should show as registered in your voip.ms account.

A screenshot of a successful voip.ms registration.

Plug in the phone and make calls!

After you plug in the phone to the port on the Grandstream device and pick it up, you should hear a dial tone, and you should be able to make and receive calls.

Even though my daughter had talked to others on one of our smartphones many times, she was so delighted to make and receive her first calls on her own phone line.

You can view the Call Detail Records (CDR) report in your voip.ms account to understand how much calls are costing, where calls are coming from and going to, etc.


Using Laravel and an e-ink tablet to make a DIY digital sign for dynamic office window message display

I wanted a sign I could mount in the window at the front entrance of our newspaper’s office to display customizable information about our office’s current status and other useful info.

If you’ve ever researched this category of products, you know there are many vendors out there who will happily sell you very expensive devices and supporting accessories to make this happen. This is “call us for pricing” level product sales meant for hotels, convention centers, malls and large office buildings, not for a small community newspaper on a budget.

Even the few standalone products I was able to find for sale on Amazon and elsewhere seemed pretty janky. I’d have to download an app or install a hub with a proprietary communication technology or be constrained to a certain number of characters and layout, or some other limitation I wasn’t quite happy with.

I decided to ask the Fediverse:

A Mastodon post that reads: "A hardware product that seems like it should exist but that I'm having a hard time finding:
* E-ink sign to go in a store window and display basic text (open/closed, etc)
* Wifi connected, no hub or cloud subscription needed
* Programmable via some kind of API or app, refresh delay is fine
* Battery or plug-in is fine

Suggestions? (Edited to add: Unfortunately I don't have time to assemble one from parts.)"

(I learned while writing this that Mastodon posts do not seem to embed in WordPress seamlessly – tragic!)

At first, the responses were reinforcing how difficult this might be to find, but then my colleague Scott Evans made a comment that sparked the eventual solution:

I feel like an e-ink reader of some kind might be your best bet (one that can run Android apps). Then you could install a kiosk style browser and update the page it’s pointing at. Something from Onyx?
https://toot.scott.ee/@scott/statuses/01JKBE3QZWEZCMN2QZZH75R6BY

After some searching I found this wonderful blog post by Jan Miksovsky, MomBoard: E-ink display for a parent with amnesia. Jan described using a BOOX Note Air2 Series e-ink device to create a dynamic sign display for Jan’s mom. They used a web browser to load a simple website that would display the latest customized messages based on details configured in web interface elsewhere, source code here. I love it!

I emailed Jan with some questions about the setup and Jan was kind enough to write back with a clarification that the original BOOX ability to launch a web browser on device restart appears to have been removed, but a request is in to restore this functionality.

Jan also had a helpful thought about how to launch the browser in to full-screen mode, which I haven’t tried yet: “That’s controlled by whether a website has a web app manifest defined for it. If it does, then the browser “Add to Home Screen” command should allow you to add the site to your home screen. When launched, it should open in full screen mode.

I found a used Note Air2 device on eBay for $189 plus shipping and tax. A non-trivial expense, but far less expensive than any of the other options I was finding.

When it arrived I turned off all of the “auto-sleep” type settings so that the device would basically stay on all the time. I tested out having the web browser stay open on one page for days on end, and it worked! Now I just needed to figure out my own web interface to manage the sign message.

Continue reading Using Laravel and an e-ink tablet to make a DIY digital sign for dynamic office window message display

Script to remove all asterisk call agents from all phone queues

At the newspaper we make heavy use of FreePBX and Asterisk to power our phone system. That includes the use of the call queue feature, where a caller interested in subscriptions or advertising or placing an obituary can be routed to the right place via a phone menu, hear an appropriate message, and then ring through to one of the staff members trained to help with that particular topic, or leave a voicemail in the right place if no one is available. We’re a small paper and our phone system is mostly quiet, but I have seen days where multiple calls are being handled simultaneously, and queues are very helpful.

One aspect of our setup that has taken some figuring out is having staff log in and out of the phone system so that they can be available to answer those queue calls at the right time.

Remembering to log in at the start of the day is fairly straightforward, though is still a habit all of us our developing. Remembering to log out at the end of the day is for some reason a bit more hit and miss; when my brain has decided it’s time to leave the office or stop working, for some reason logging out of the phone is frequently not top of mind, and apparently that’s often true for my coworkers as well.

It may not seem like it would be a big deal to just let folks stay logged in all the time, but it can mean the difference between a caller sitting on hold for an extra minute or two as the phone system rings the phones of folks who have left for the day, or the caller more quickly getting a useful message and the option to leave a voicemail. We could address this through more complex conditional logic in our phone system set up, but for now I’m trying to address it in a way that mostly maintains user-level control.

So, based on some other bits and pieces of scripts found on Stackoverflow and elsewhere (# #), I put together this Bash script that logs everyone out of all queues:

#!/usr/bin/bash

# Remove an Asterisk agent from queues, or all agents from all queues

Help()
{
   # Display Help
   echo "Remove Asterisk dynamic agents from queues."
   echo
   echo "Syntax: remove_from_queue.sh [-a|eh]"
   echo "options:"
   echo "a         Remove all members from all queues."
   echo "e <123>   Specify an extension to be removed ."
   echo "h         Print this help."
   echo
}

while getopts ":ahe:" option; do
   case $option in
      h) # display Help
         Help
         exit;;
      e) # Enter a specific extension to be removed
         member=$OPTARG;;
      a) # set all queue members to be removed
         all=true;;
      \?) # Invalid option
         echo "Error: Invalid option"
         exit;;
   esac
done

## all queues
declare -a queues=(`asterisk -rx "queue show" | cut -d " " -f1`  )

for q in "${queues[@]}"
do
    ## all agents in queue
    declare -a members=(`asterisk -rx "queue show $q" | grep "/" | cut -d"(" -f2 | cut -d" " -f1`)

    for m in "${members[@]}"
    do
       if [ ! -z $member ]; then
          if [[ $m == *"$member"* ]]; then
              echo "Removing member Local/$member@from-queue/n from $q"
              cmd="queue remove member Local/$member@from-queue/n from $q"
              asterisk -rx "$cmd"
          fi
       else
         if [ "$all" = "true" ]; then
             echo "Removing member $m from $q"
              cmd="queue remove member $m from $q"
              asterisk -rx "$cmd"
         fi
       fi
    done
done

I run it via cron like so:

# Remove all asterisk queue agents from all queues at the end of the day
0 18  *  *  *  root       /usr/local/bin/remove_from_queue.sh -a

Locking Adobe InDesign files for editing in shared network or cloud folders

Today I had a chance to help a print publication solve a workflow challenge that is apparently very common.

If you open an Adobe InDesign layout file from a local folder on your computer, the software creates an Adobe InDesign Lock File (.idlk) in that folder, which prevents the same file from being opened by another copy of InDesign. But if the file exists in a folder that is shared via network or cloud service, InDesign does not create a lock file when the InDesign file is opened for editing. This includes Adobe’s own “Creative Cloud” file sharing option.

There may be good technical reasons for not creating or syncing lock files across network folders, but the end result is that multiple users can decide to open the same file at the same time, and whomever saves their changes last will “win,” with the other user’s changes being lost.

In researching this, I found it was not some edge case. There seem to be many newsrooms and other organizations struggling with this every day. They work around it by doing things like copying the InDesign files to a local folder, making their changes, and then uploading back to the shared folder, hoping that the internal communication about such things is sufficient along the way. This Adobe Community Support forum thread illustrates the pain points involved.

Thankfully, Adobe InDesign is a scriptable software tool, and so
Max Schmidt and the folks at t3n created a script that creates a locking system for network shared InDesign files. And there was much rejoicing!

After installing the script on all the devices that will be accessing shared InDesign files, anyone trying to open a file that someone is already editing gets an error message and then the file is closed. (I submitted a Pull Request to expand the README documentation so the installation process is a bit clearer.)

In the long run, Adobe needs to solve this problem in a more standard way for its users. But this script is a great alternative option and I hope bringing some additional attention to it helps out other publications or news rooms that might be struggling with the same challenge.

Updated April 26, 2023: the current version of the script we are using is here:

https://github.com/CivicSparkMedia/indesign-scripts/blob/main/Startup%20Scripts/prevent_multiple_opens.jsx

We found that we had to place this version in the Startup Scripts directory for it to keep working.

My standard Laravel development tools

Now that I’ve been actively developing applications with the Laravel framework for a few years, I thought I’d write down the tools and services I tend to use on a regular basis in that work.

I’ve spent a fair amount of time researching and experimenting with these tools and their alternatives in order to make a choice, so maybe it will help someone else who hasn’t gone through that yet. I’m always glad when others share details about their development environments so that the rest of us who are just getting going can build on that foundation.

Hardware and Development Environment

Launching a New Project

composer global update laravel/installer
laravel new example-app --git --branch="main"
cd example-app
valet link
valet secure example-app

Then I create a database, add the DB info in .env, run artisan migrate, and I’m ready to develop. Sometimes I have to make sure PhpStorm has the right coding standards and PHP Code Sniffer config in place.

Sometimes I add a .psysh.php file to my project repo with these contents:

<?php
DB::listen(function ($query) {
    dump("[{$query->time}ms] {$query->sql}");
    if ($query->bindings) {
        dump($query->bindings);
    }
});

When using artisan tinker, this prints out any SQL queries that were run by a given command within the tinker session, for faster debugging.

For WordPress projects, I use a customized version of this “valetpress” bash script to initialize new projects.

Continue reading My standard Laravel development tools

Creating a personalized, private RSS feed for users in Laravel

In building WP Lookout I had the need to create user-specific, private RSS feeds as a way for users to get updates and information specific to their account. Here’s how I did it.

I started with the laravel-feed package from Spatie, which allows you to easily generate RSS feeds, either from a model’s records or from some other method that you define. I found that someone has proposed a feature and submitted a PR to add support for signed routes, which is Laravel’s way of adding a hash key to a given URL so that it can’t be accessed if it’s been modified, perfect for something like a user-specific RSS feed. But the Spatie folks decided not to include the feature, so I had to figure out how to do it on my own.

First, I added the package to my project and published the related config file:

$ composer require spatie/laravel-feed
$ php artisan vendor:publish \
    --provider="Spatie\Feed\FeedServiceProvider" \
    --tag="config"

Then, I added a user-specific feed identifier to the User model:

$ php artisan make:migration add_feed_id_to_users_table --table=users

The migration looked like this in part:

public function up()
{
    Schema::table('users', function (Blueprint $table) {
        //
        $table->string('feed_id');
    });

    DB::statement('UPDATE users SET feed_id = ...');
}

The UPDATE statement there is used to set the initial value of the feed identifier for existing users. An alternative would have been to make the field nullable and then set it elsewhere. For new users, I set the feed identifier as users are created, via the boot() method in the User model:

Continue reading Creating a personalized, private RSS feed for users in Laravel

Remembering DB_Browser

Book cover for the O'Reilly book Oracle & Open Source

Today on Twitter I was remembering that one time when an @OReillyMedia software book said that some code I’d written was “definitely worth a look.”

It started as a project for an internship at a local ISP, where they had a need to quickly browse, search or update a certain database using a web browser. I threw it together in a few days using Perl and the data dictionary info offered by PostgreSQL (and later MySQL and Oracle)

I called it DB_Browser, and it was basically what PhpMyAdmin became, but abstracted out enough to use with any of those three database systems. (Solid database abstraction layers used to be a real thing!)

It was almost certainly full of security vulnerabilities, relying entirely on the use of .htaccess rules to prevent total chaos. The UI was as ugly as sin, the code not much better. But it worked, and I believe it was used in some form until the ISP was acquired years later.

I took the time to package it up and publish it. I think I put it on “Freshmeat,” a site that was just a feed of newly released software, back when you could even try to track such things. It started getting downloads and people started using it.

Continue reading Remembering DB_Browser

Life so far with a 2020 13″ MacBook Pro

I recently switched from using a Mid-2015 15″ MacBook Pro to a 2020 13″ MacBook Pro with Apple’s Silicon M1 chip. It was a Big Deal in the sense that my computer is a primary daily tool in my personal and professional life. So much of my work, my creativity and the management of my life is handled through this one device, so it’s always a little scary to make a change. (I actually could have been happy continuing with my previous laptop if its battery hadn’t been expanding, causing the entire computer to bulge in weird and alarming ways.)

Here are a couple of things I observed in making this transition and in using the MacBook every day since:

Apples to Apples

My previous MacBook Pro was pretty high end (2.8 GHz Intel Core i7 Processor, 16 GB 1600 MHz DDR3 RAM, Intel Iris Pro 1536 MB Graphics, 1TB HD) and very fast for the things I used it for. These included software development, hosting multiple software development environments, audio and video editing and rendering, graphic design and photo editing, and LOTS of browse tabs. It took everything I could throw at it and I never felt slowed down by the computer itself.

So the idea of “downgrading” to a smaller screen (13″ instead of 15″), fewer ports, and the same amount of RAM but 5 years later was a bit nerve-wracking.  Conventional wisdom for a long time was that 13″ MacBook Pros were fine for some kinds of advanced computing but that the 15″ model was always the best option for the kinds of things I use it for. Maybe this was just me naively buying into Apple’s marketing, but it seemed to be supported by testimonials from colleagues over the years, and was a strong narrative in my head nonetheless.

But I’d heard and read that the Apple Silicon M1 chip was a game-changer, and that any comparison between Intel and the newer processors was not really valid. And after seeing enough stories from real users where they said the new chip plus 16GB of RAM was even faster running some of the same software I do, even with Rosetta 2 translation turned on, I was sold.

Continue reading Life so far with a 2020 13″ MacBook Pro

Intercepting mail with MailHog in Laravel Valet

I’m trying out using Laravel Valet to manage the development environments for both my WordPress and Laravel related work. (This is not the result of any dissatisfaction with VVV, which I’ve happily been using for the WP work, and Laravel Homestead, which I’ve happily been using for Laravel work, but comes as a necessity now that I am using a Mac with Apple’s M1 ARM chip, which doesn’t support Intel Vagrant virtual machines.)

The Valet installation and setup was easy and fast using their instructions, and I’ve been able to successfully move projects over to it without a lot of hassle. The one place where I was really bit was taking for granted how those previous virtual environments where handling the intercepting of email generated by my applications, so that they didn’t actually go out onto the Internet for actual delivery. I got used to spinning up environments with copies of production data and not worrying about real users getting email messages.

Well, you can guess what happened when I did that in Valet, which by default delivers email just like any other email generated from a process running on my Mac. Spinning up a WordPress dev site with a slightly outdated database dump and with functionality that is all about notifying users via email of things that are about to happen or have happened meant…lots of emails going out.

Ugh. Apologies, installing Stop Emails and other cleanup ensued.

Fortunately, the long term fix is pretty easy. Yes, there are various plugins one can install on individual WordPress sites to stop email from going out, or to change default SMTP behavior. But I didn’t want to have to worry about that each time I clone a site. So instead I changed the default SMTP behavior for the php-fpm processes that Valet runs to deliver all mail to MailHog.

First, I installed MailHog:

brew install mailhog
brew services start mailhog

Then, I added a smtp-mailhog.ini file in the PHP conf.d directory for my setup. In my case that was each version in /opt/homebrew/etc/php/X.X/conf.d. The contents of that file are:

; Use Mailhog for mail delivery
sendmail_path=mailhog sendmail

Then I ran valet restart and tested by triggering a password reset email from a WordPress site, and confirmed that it had been intercepted by visiting the MailHog interface at http://127.0.0.1:8025.

Of course this setup may not fit every use case, so adjust your config accordingly. (I submitted a PR to the Laravel docs with this info, but understandably it was probably too specific to my setup.) Even if you don’t change the PHP-level settings, with MailHog installed you could set up individual sites/applications to send to it as needed.

SMTP relay through Fastmail from Postfix on macOS Mojave

When my Mac laptop tries to send me email — the output of a cron job, for example — by default it ends up in a local mailbox file that I never check. I want the mail to get to my regular email account, but I don’t want it to relay that message through whatever random ISP I might be connected to at any given time, or over the open internet. It’ll likely fail, it’s not secure, and there are better ways.

Instead, I relay all outgoing mail sent from macOS through my email provider, Fastmail (affiliate link). This especially makes sense since most of the email from my OS is going straight to my inbox hosted at Fastmail.

The notion of relaying email through a specific provider is built in to the Postfix mail transport agent that comes with macOS, so in theory it’s not a big deal to set up. In reality, I’ve found it to be a somewhat fragile configuration, and rarely does it survive a macOS upgrade or switch to a new computer. So I’ve come to document it pretty heavily for my own reference. I recently went through the process again, so thought I’d write it up here in case it’s helpful to others.

Most of these steps are derived from this nice compilation of steps that applies to macOS Sierra through Mojave.

  1. Edit /etc/postfix/main.cf and add these lines to the end:

Continue reading SMTP relay through Fastmail from Postfix on macOS Mojave